Sea Dreaming


Sea Dreaming, originally uploaded by ivoryblushroses.
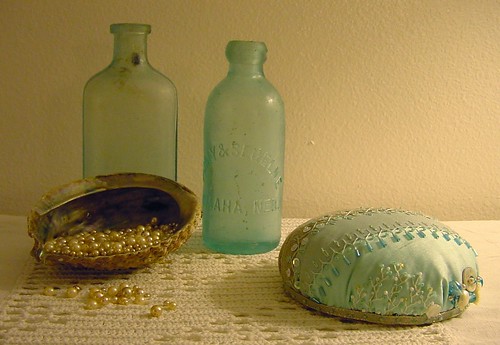
After 6 nights in a row of work, I was thrilled to have last night off! Since I have to go back to work tonight, I stayed on my night schedule and stitched the night away and was able to complete the first of the "sea dreams" pincushions! It goes beautifully with the old aqua glass bottles and the abalone shell of pearls on my bookshelves!

Since I've received a few questions about how to make the pincushions, I thought I'd provide a tutorial. If you make one, I'd love to see a picture!
CRAZY QUILT CD PINCUSHION TUTORIAL
PC embellishment complete
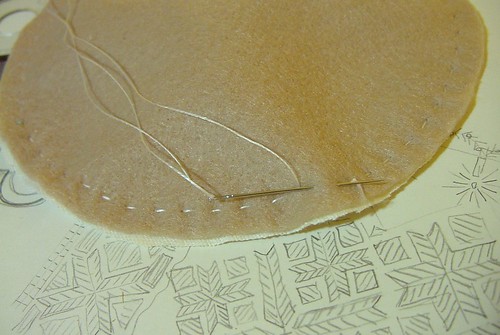
Step 1 ~ piece a block about 9" in diameter. Baste a seam 1/2" to 1" from the edge, all the way around. I'm finding that I end up turning about 3/4" to 1" under when I assemble this, so don't embellish any closer to the edge than that.
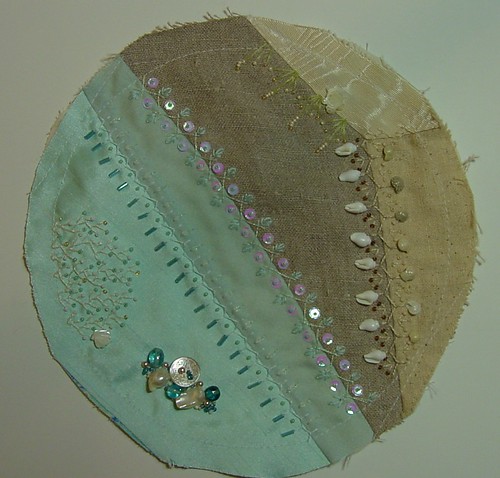
Step 2 ~ Embellish your block!
01 gathering top
Step 3 ~ With strong nylon thread (I used size D Belding Corticelli nylon beading thread), sew 1/8" long running stitches all around the block. This will be used to gather the block, so don't tie it off yet!
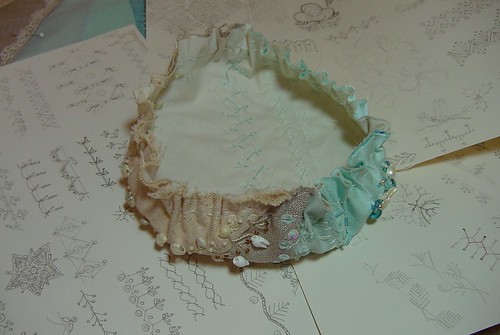
Step 4 ~ Pull up the gathering stitch until the sides are raised about 1 to 1 1/2".
02 stuffing w wool
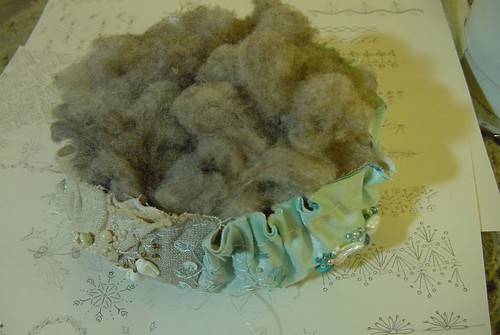
Step 5 ~ Place your stuffing in the center. I used clean washed wool ~ leftovers from my spinning projects, but polyfil would work just as well. Use lots, you want it to be fairly firm!
03 adding CD
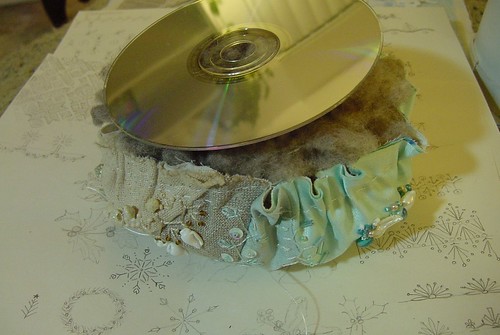
Step 6 ~ place an old CD you no longer need on top of the filling and push it down, tucking in the filling as you pull up the gathering thread.
04 tightening gathering
Step 7 ~ If needed you can use a pencil or knitting needle to push more stuffing through the center hole if you need. Spread the gathers out evenly and snug up the gathering thread and tie it off. Don't cut the long end as you can use it to begin the next step.
05 stitching top tight
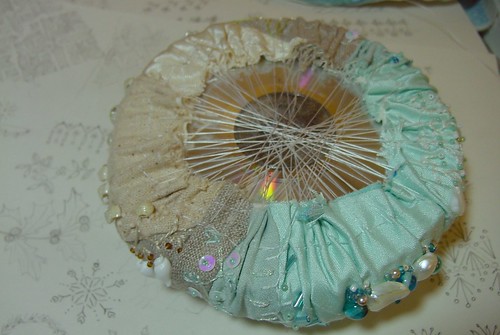
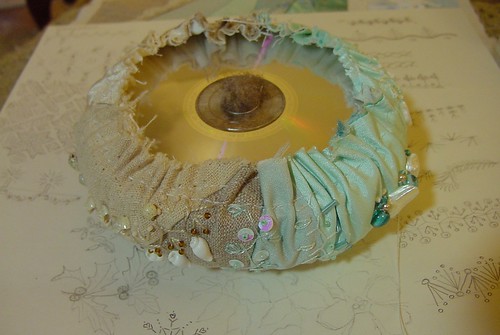
Step 8 ~ Using more of the strong nylon thread, work from one side to the other and stitch the top tight over the CD. This step pulls the fabric snug around the stuffing and helps to keep it in place. Continue until you've pulled the entire top tight. Tie off your thread and cut.
06 preparing bottom
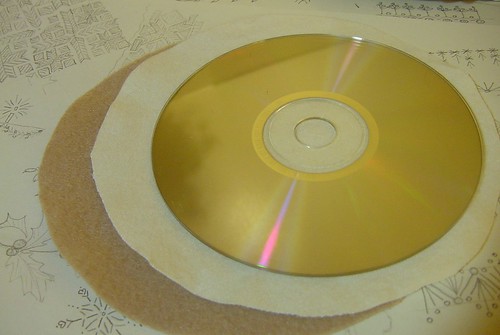
Step 9 ~ Prepare the bottom of the pincushion. Cut a circle of felt about 3/4" to 1" larger than the CD. Because the felt I used was thin and somewhat transparent, I lined it with a circle of flannel. Plain muslin would work just as well. Even interfacing would work well for this if needed. Place the felt and lining together and treat as one piece.
07 gathering bottom
Step 10 ~ Sew a gathering stitch seam around the circle of felt (using 1/8th inch long stitches about 1/4" from the edge of the felt.
08 bottom stitched tight
Step 11~ place 2nd CD in circle of felt and pull up the gathering stitch.
Step 12 ~ Sew across the felt to pull it tight around the CD just as you did for the top of the pincushion.
09 ready to attach base
Step 13 ~ Place the bottom piece on the underside of the pincushion with the gathering and tightening stitches places together.
10a whipping base to top
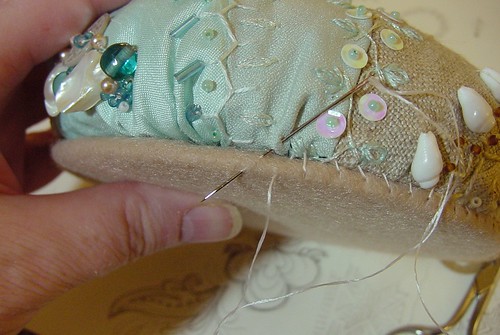
Step 14 ~ With strong thread, sew the top and bottom pieces together using a whip stitch or a blanket stitch. I used a whip stitch on this as I knew I was going to cover the seam.
11 added ribbon and bead trim
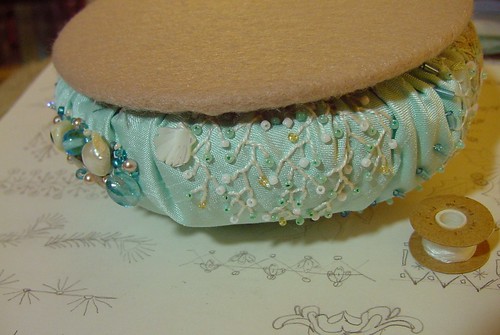
Step 15 ~ Place trim around the bottom edge and sew it to the felt base using a backstitch. I added a bead with each backstitch to accent it. Turn under the end of the trim and blind stitch it down when you get to the end. You are done! Your pincushion is now ready to use!
15 side view 3
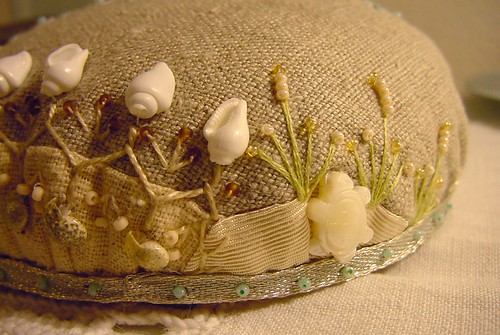
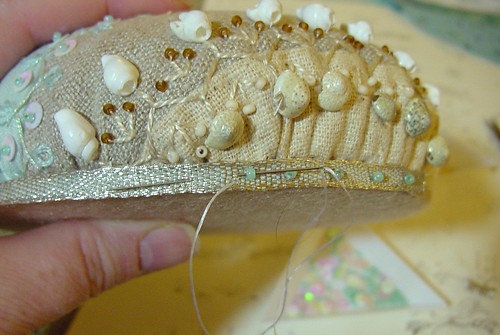
Here is a look at the different sides of mine. On the beach side, there are shells and beach grass.
16 side view 4
Embellished seams.
14 side view 2
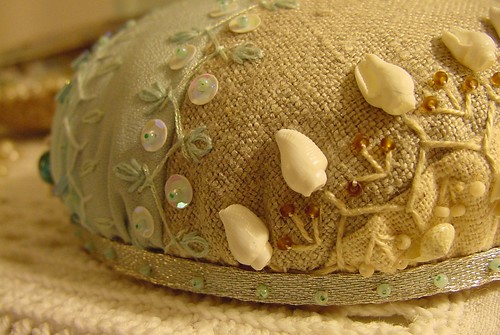
The sea side of the pincushion has a coral like fan and a cluster of pearls and aqua beads.

Blessings and Peace to all!

Comments

Laura said…
Thank you! It look sooooo pretty!
Thank you for this tutorial! The pincushion is lovely. I will try to make one too :))
claitte said…
What a lovely embroidery ! Thank you for the tutorial.
Farah Muzaffar said…
What an idea, lovely.... I think now my corrupted CDs go to right place. Thanks a lot for such a creative Idea...

http://craftaworld.blogspot.com/
Eleana said…
Wow, I do like your idea and explanation! Thank you for such a nice master-class!
All my best from Ukraine!
Stitching Lady said…
Lovely, lovely - I love your tutorial. Thanks so much.
Anneliese
Faith said…
Thank you for sharing the directions!
FQ Stash Queen said…
Lovely pincushion and one that intrigues me enough to try it for the next swap. That doesn't mean I'll necessarily give it away. Looks like a lot of work, but I love beading and have made several items for weddings. Thank you so much for sharing your wealth of info; not sure I would have figured it out myself.
Anonymous said…
It's so beautiful. I will try to make one. Thanks for sharing your tutorial.
Mánya said…
Thank you for this lovely tutorial!
Hugs,
Annamaria
Unknown said…
Thank you! Very nice and needed!
Lee Albrecht said…
Obrigado por passar o passo a passo de tão belo trabalho. Parabéns pela delicadeza do trabalho
Anonymous said…
wo a very odd way to do apincushion on..but nice thanks for sharing
Kays Kids said…
I have just found your blog and it is delightful. I love the tutorial on the pin cushion.
Hugs
Kay
carla said…
Saw this on Pinterest and it's beautiful!

Just the kind of project I love and hope to make for Christmas presents this year.

Thanks for sharing it with all of us.
jeaniee1953 said…
I was immediately attracted to this piece, it's absolutely gorgeous! Thanks for sharing how to make it. Jeanie
Busy Bee said…
I just love this and can't wait to make one of my own.
www.theratherbusybee.blogspot.com.au
veromilu said…
a big thanks for the tuto, I have made one with this
Eszter/SubRosa said…
Thanks for this great idea!
Laurie said…
Beautiful Lisa, thanks for sharing with us! I'm going to do this.
Looks good, I guess everything needs a little art to become more beautiful. I love this blog, your creativity will bring you further. My bridal jewelry pearl and crystal designer likes the same.
Elizabeth said…
great idea... Beautifull.
Groeten uit Nederland.
Lisha Vidler said…
I love this tutorial! Recently, I made two pincushions following your directions. I enjoyed it so much that I wrote a two-part article that explains how to sew a miniature crazy quilt, along with a diary showing how I used your tutorial to make my pincushions. My article links directly to your tutorial, so readers will know where my inspiration came from. If you'd like to take a look, you can find the articles at my website, Yesterday's Thimble.

Here is a link to the first half of the article: http://yesterdaysthimble.com/tutorials/crazy-quilt-pincushions-part-i/

Thank you for creating such beautiful works of art! Your work is an inspiration.
perla said…
Thank you for this great tutorial!!!
Now I know what to do with old CD's
Véronique Rose said…
absolument magnifique, merci pour le tuto,
la balade sur votre blog est un bon moment de bonheur.
douce journée
rose
Véronique Rose said…
merci pour ce tuto superbe, votre pique aiguilles est superbe.
douce journée
rose
Rose Anne B said…
Lisa this is awesome, I've a number of CDs lying around - great idea. thank you for posting the tutorial.
katherine said…
Lisa,I just found you on line yesterday! What great timing. I needed a cheerful diversion for end of winter blahs. I just started a CD pincushion! Your work is incredible. All your posts radiate beauty! God's Blessing to you! Katherine
zenuwpees said…
Magnifique felicitation bonne journée Marie-Claire
Anonymous said…
the pin cushion is very beautiful and will be making one or more for myself and granddaughter
Nedra Jones
crazed said…
Love your work and the tutorial. Plan to make some of these later in the year for CQJP2015, working in a bear first.
Jenny Jo said…
Hi Lisa, Thank you for the tutorial. I love your work, always so elegant! I'm just getting ready to embark into crazy quilting. I practiced my first stitching today and loved it. I'm making quilts for 2 of my granddaughters & all I have left to do before assembly of blocks is to transfer some photos to fabric. I have some great underwater shots so going with the mermaid theme! Do you mind sharing where you get your tiny seashells? I would love to sew some on their quilts.

Blessings to you!
lakenreich said…
Such a beautiful piece-thanks for sharing.
*~Nightshadow~* said…
Fantastic idea! Thank you so much for the very clear instructions...what a great way to recycle!
Beautiful and loving your hand embroidery, impeccible!
Unknown said…
Hi,Just looking for tutorials on pin cushions and love this one. Your pin cushion is a work of art, very beautiful. Thanks for the step by step instructions and photos, it's much appreciated.
Anonymous said…
Nicely done! Beautiful and cleaver.
Anonymous said…
I love pin cushions and I like how you repurpose the cd's. Yours are beautiful. I'm inspired by your work and want to try and make one for myself. I can't wait to see what else you have created on you site. Thank you for sharing! FROM: Emma Lee

Popular Posts