Learn Something New Every Day!
This is what I learned today.
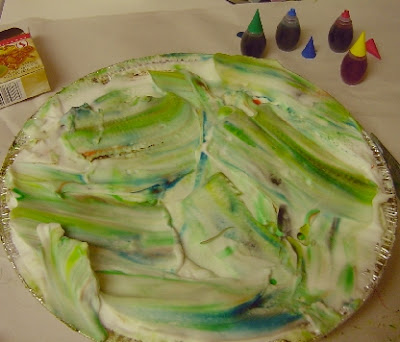 "What is that," you say? No it isn't whipping cream or frosting or even merangue. It's shaving cream!!! In a scrapbooking magazine, I had seen some artwork that I really liked created with papers made using "The Shaving Cream Technique". Intrigued, I tried to find more info in the magazine, but all it did was refer me to an issue of the magazine from 4, yes FOUR years ago!!! Lot of help that is! So last night, I was thinking about it again and decided to google it. Lo and behold, I found thousands of entries on this technique.
So this evening when some other plans fell through and I found myself with a bit of free time on my hands, I decided to try it. Thanks to the artist who left his can of shaving cream here and the assistance of some food coloring, a good part of my white cardstock stash and two hours, I have had so much fun and turned out some truely creative and fun papers!
The directions in brief, in case you don't want to google it yourself, are simple.
First cover your working area with newsprint or some other such surface protector as this gets messy! Get some decent fitting vinyl gloves for this too. Remember that food coloring is a dye and it can make a rainbow of your hands, countertop, etc.! It turns pink babies into rainbow babies. Yikes!!!
1 ~ in a pie tin (or cookie sheet depending on how large a paper you plan on using) place about 1" of shaving cream. Smooth it out a bit. I've never used shaving cream before. It expands. A lot! Being the girly-girl that I am, I have used foundation crack filler before. This expands a lot like that, though it washes off much easier! LOL! Give it a minute or two and then smooth it out a bit.
2 ~ Drop small drops of food coloring on the shaving cream.
3 ~ using a toothpick, chopstick, pencil or palette knife, swirl the color in the shaving cream. It works rather like marbeling which I've always wanted to try!
4 ~ Start with one or two colors. Keep adding, smoothing, mixing a bit. I found that I liked it once some of the colors were blended a bit more but there will still splotches of color, sort of an inbetween state.
5 ~ Place your paper on the shaving cream and press it in (you want the entire surface to touch the tinted shaving cream)
6 ~ Peel the paper off the shaving cream and use your palette knife (or an old plastic credit card ~ see, there IS a good use for them other than buying things!) and set aside. After a couple minutes, you can gently wipe any remaining shaving cream off of them with a paper towel.
Note: I started off using acrylic paints. Even though they were pretty runny, they didn't stain the paper and looked just blotchy. Then I switched to food coloring. Many crafters apparently use "reinkers" for ink pads. As much time as I've spent in art stores and scrapbooking stores, I have to admit that I've never seen these. Since I'm trying to use what I have, I used the food coloring. I loved them. They dyed the papers instantly and I could mix the four colors to get more (in a small glass bowl before dropping it on the shaving cream). Once I had printed and mixed to the point where the top of the "pie" got muddy looking, I scraped the top off and started over again, adding shaving cream as needed.
So much fun! It was hard to stop! 

I'm planning on using a lot of these to make ATC's otherwise known as Artist Trading Cards (if swapped) or ACEO's (if sold) and I'm sure that many of them will get drafted into use for greeting cards and scrapbooking! I'd love to know what you think! Leave me a comment!
So about those rainbow babies... Once upon a time, when I was young, maybe 14 or 15, I was babysitting for some neighbors. A 2 year old boy and his 3 month old little brother. This family was building their own home and at the timemuch of it, including the kitchen was still unfinished. The cabinets were all sitting on the floor with all the normal kitchen stuff inthem. Everything was easily accessible. This was one of those all day babysitting jobs and I'd had the kids outside, inside and we'd been keeping busy. The 2 year old as happily playing with his truck, driving it through the house. The baby was sitting in his babyseat on the floor. And I took advantage of the lull to use the bathroom for a couple of minutes.
Upon emerging from the bathroom, I discovered just how much trouble an unsupervised 2 year old can get into. In that two minutes, the 2 year old found the food coloring in one of the kitchen cabinets and proceeded to "paint" his baby brother. Blue, green, yellow and red. You can imagine my horror! Little babies don't really look very good in brightly colored spots. Especially when it isn't even your own baby! And how in the world do you explain something like that to the parents? I learned then that food coloring doesn't come off with normal washing. Lemon juice doesn't work either. So the parents came home to a rainbow baby and a son with rainbow hands! They laughed and laughed and were so great about it. But I don't think I ever babysat for that family again!


Comments